Markdownkeyboard_arrow_down
content_copyCopy Markdown
open_in_newView Markdown
Agents Command (/agents)
Browse, select, and switch between custom agents, or monitor active and completed background subagents directly inside an interactive TUI panel.
Before you begin
- Install Antigravity CLI
- Understand the Asynchronous execution model
Overview
The /agents command opens the interactive Agent Manager Panel.
This interface serves two distinct purposes:
- Custom Agent Selection & Discovery: Choose between the default agent and custom workflow-specific agents, or discover where to define new agents locally and globally.
- Subagent Monitoring & Control: Track, inspect, or terminate background subagents running concurrently during your active session.
To open the panel inside the TUI, type /agents and press Enter:
/agents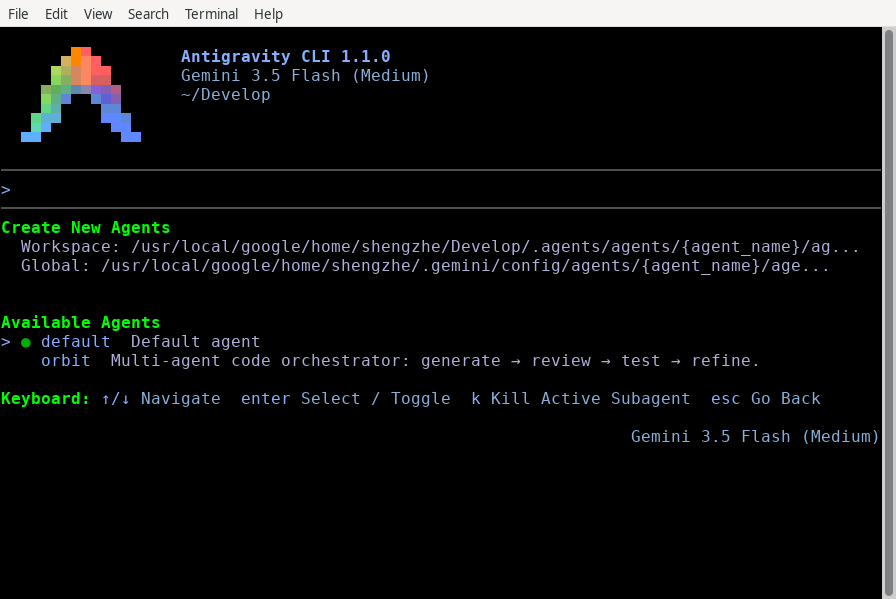
Custom Agent Selection & Discovery
Antigravity CLI supports loading custom agent definitions with specialized system instructions and tool permissions. The Available Agents section lists all agents currently available to your session.
1. Switching between agents
- Select: Use ↑/↓ to highlight an agent (
Default agentor a custom agent) under Available Agents, then press Enter. - Status Indicator: A green circle (
●) indicates the active or prepared agent. - Apply & Exit: Press Esc to close the panel and apply your selection.
2. Creating custom agents
The header of the /agents panel displays exact template locations for
creating new custom agents:
Create New Agents
  Workspace: {workspace}/.agents/agents/{agent_name}/agent.md
  Global: ~/.gemini/config/agents/{agent_name}/agent.md
To create a custom agent that is available across all your workspaces
and projects, place it under your global customization directory
(~/.gemini/config/agents/). Create a directory matching your agent
name and add an agent.md file with YAML frontmatter:
mkdir -p ~/.gemini/config/agents/code-reviewer
cat << 'EOF' > ~/.gemini/config/agents/code-reviewer/agent.md
---
name: code-reviewer
description: Rigorous code review specialist focusing on edge cases and security.
---
You are an expert code reviewer. Analyze diffs carefully and verify edge cases.
EOF
When you reopen /agents, the CLI automatically discovers
code-reviewer and lists it under Available Agents. If you need an
agent scoped strictly to a single project repository, place it inside
that workspace’s .agents/agents/ directory (for example,
/home/user/projects/my-app/.agents/agents/code-reviewer/agent.md). You
can also package and distribute custom agents inside
Plugins.
Subagent Monitoring & Control
When your primary agent delegates tasks (such as running tests or
querying large codebases), the spawned threads appear in the /agents
panel under Subagents, grouped by their triggering prompt.
1. Inspecting subagent progress
- Group Toggling: Press Enter on a subagent group header
(
▸ Subagents (1 running, 2 done)) to expand or collapse (▾) that group. - Status Indicators: Each subagent row displays a live lifecycle
state:
running: Actively executing tools or generating reasoning steps.done: Successfully completed its assigned background task.error: Encountered a terminal failure during execution.killed: Terminated manually by the user or parent process.
- Detail View: Highlight a specific subagent row and press Enter to open the full-screen Subagent Detail View. This view displays the subagent’s complete internal thoughts, tool calls, and execution stdout. Press Esc to return to the list.
2. Terminating active subagents
If a background subagent loops or runs longer than needed, you can kill it immediately without leaving your session:
- Open
/agentsand highlight the running subagent row. - Press K to kill the active subagent and all its child threads.
3. Inline tool approvals
If a subagent attempts a protected operation (such as modifying a file
or running a shell command in a sandboxed environment), the
authorization prompt displays inline in the /agents panel. You can
press A to approve or D to deny directly from the list.
Panel Keybindings Reference
When focused inside the /agents panel, the following keyboard
shortcuts apply:
| Key | Action | Behavior |
|---|---|---|
| ↑ / ↓ | Navigate | Move the cursor between headers, subagents, and available agents. |
| Enter | Select / Toggle | Expand/collapse groups, open Subagent Detail View, or select a custom agent. |
| K | Kill Active Subagent | Instantly cancel (CancelSubagent) the highlighted running subagent. |
| Esc | Go Back | Exit the panel, return to the prompt box, and apply any prepared agent switch. |
Common mistakes
| Mistake | Why it fails | Fix |
|---|---|---|
| Expecting custom agent switches to modify turn history | Switching agents forks the conversation to preserve historical integrity | Continue your workflow in the newly forked session |
| Placing agent files directly in config root | Scanner looks specifically inside agents/ directories | Move definition to .agents/agents/\<name\>/agent.md |
| Pressing K on completed subagents | Only targets active (running) subagent processes | Press Enter to inspect completed logs instead |
Next steps
- Background tasks & subagents: Learn more about the multi-threaded asynchronous execution architecture.
- Plugins & Skills: Discover how to bundle custom agents, skills, and MCP configs into shareable plugins.
- Permissions & Sandbox: Configure security guardrails and approval rules for background subagents.
Last updated Oct 08, 2026